
Home made storage building
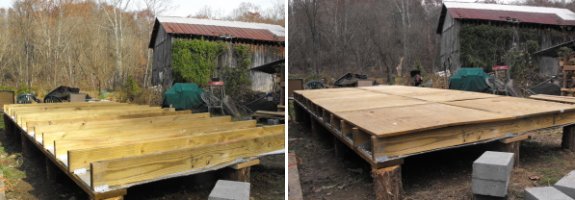
We now have all the joist brackets secured down with the plywood firmly
in place. The next step will be to figure out where the windows go in
the framing phase of the storage building project.
| This post is part of our Building a Storage Building from Scratch
series.
Read all of the entries: Part 1: Foundation
Part 3: Walls and scavenging lumber
Part 5: The roof
|

Or explore more posts by date or by subject.
About us: Anna Hess and Mark Hamilton spent over a decade living self-sufficiently in the mountains of Virginia before moving north to start over from scratch in the foothills of Ohio. They've experimented with permaculture, no-till gardening, trailersteading, home-based microbusinesses and much more, writing about their adventures in both blogs and books.
Want to be notified when new comments are posted on this page? Click on the RSS button after you add a comment to subscribe to the comment feed, or simply check the box beside "email replies to me" while writing your comment.
I've never seen anyone lay the rim joists flat like you have them... I would be afraid that they would bow downward between posts in a very short time. The reason most rim joists are seen laid on edge is that the strength in a 2x4, x6, x8, etc, is in the width and most of your load will be vertical from the weight of the building. I'm no carpenter, but I've built a few sheds. Since the framing for the walls generally do not have much resistance to bowing, the strength has to come from the rim joist or the wall will begin to sag over time.
For reference, see a couple of examples:
http://www.wikihow.com/Build-a-Shed http://blackanddecker.com/projectcenter/ProjectDetail.aspx?DOC_ID=p_2_99_23768_23775_23788.html http://books.google.com/books?id=r0gQLT9UJuQC&pg=PA22&lpg=PA22&dq=rim+joist+shed
I'm no pro either... but on pier-beam type construction, I've seen the mud joists left out but not the rim joists. I dunno... I would think the rim joists would be needed for load bearing.
but when you put your exterior sheeting on to make the walls, if you make sure that they are extremely secure to the wall framing, that could spread some of the load that the rim joists would normally take and transfer it across the entire wall. You'd probably have to use screws to do this effectively -- nails would eventually pull out I would think. You could also try putting some kind of strapping from the high or mid point of the wall over your piers to the low point of the wall between the piers in an effort to keep the wall from ever sagging. If you do that, I'd use some of that metal strapping found commonly in the lumber areas with all the holes in it.
But, again, I'm no pro either.
Thanks for the extra info! I think what we'll do is go ahead and screw 2X6s on the outside of the floor joists. That should help prevent any bowing of the mudsills (and will also close in our subfloor from critters.)
Mark is all about screws rather than nails. Glad to hear another screw advocate out there!