Rocket stove materials
 A
few of you were as intrigued by the rocket stove
concept as I was, and Roland's comments sent me searching the web for
more information. Basically, I wanted to know if I could design a
slightly modified rocket stove made out of found/bought materials to
simplify construction. I was also interested in any updates to
the design that might maximize efficiency.
Preheating
the combustion air
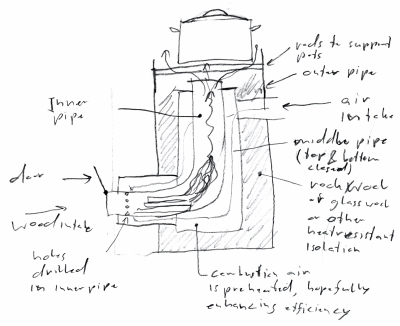
The drawing shown here
is Roland's suggestion for preheating the combustion air to increase
efficiency, in much the way that efficient
space-heating wood stoves
work. A search of the web turns up contradictory pages --- folks
who have tried similar methods are split on whether it increases
efficiency or not. Many sites suggest that the conventional
design already preheats the combustion air by passing the air intake
underneath the burning fire, so I think I'll stick with that.
Insulation
Insulating the burning
chamber is another important factor in rocket
stove efficiency. The official Aprovecho design calls for making
your own fire bricks, which are rated at about R10 when fully
assembled. Roland's suggestion --- perlite --- has an R-value of
2.7 per inch, so four inches of loose-filled perlite placed between an
inner and an outer wall could be a much easier option than making our
own fire brick. (For future reference, other folks mention using
materials such as vermiculite (R2.08 per inch) and pumice (R2 per
inch).)

Body
materials
I've seen various DIY
rocket stove options using found or bought
materials, and the ones that caught my eye used nested stove
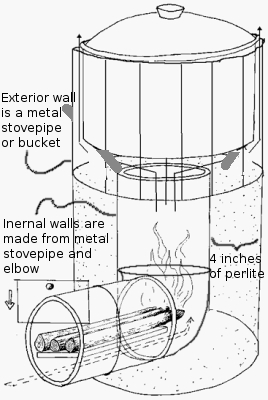
pipe. The image shown here is my revised version of the official
design made out of one big stove pipe, two pieces of smaller stovepipe,
and an elbow to connect the smaller stovepipe pieces together. As
Roland mentioned, the bigger stovepipe might be replaced by a metal
bucket --- otherwise, I'd have to add some kind of cap to keep the
perlite from coming out the bottom. I'm envisioning the pot
sitting on pieces of rebar stuck through the exterior walls rather than
welding anything together.
There's a bit of math
involved in deciding how high the interior
chamber should be and how much air space should be left between the pot
and the skirt -- more on that later!
Want more in-depth information? Browse through our books.
Or explore more posts by date or by subject.
About us: Anna Hess and Mark Hamilton spent over a decade living self-sufficiently in the mountains of Virginia before moving north to start over from scratch in the foothills of Ohio. They've experimented with permaculture, no-till gardening, trailersteading, home-based microbusinesses and much more, writing about their adventures in both blogs and books.
Want to be notified when new comments are posted on this page? Click on the RSS button after you add a comment to subscribe to the comment feed, or simply check the box beside "email replies to me" while writing your comment.

Looks like a simple and elegant design. Much easier than making firebricks, in any case. One detail; It might be worthwile make the contact area between the outer mantle and the horizontal pipe as small as possible. Otherwise you'd lose heat to the mantle through conduction.
As for the skirt, why not make it out of a piece of sheet metal rolled into an overlapping cilinder, with holes (like in a belt) for the rebar in different places so you can adjust it to different sizes? That way you can experiment with the air gap and use it for different size pots.