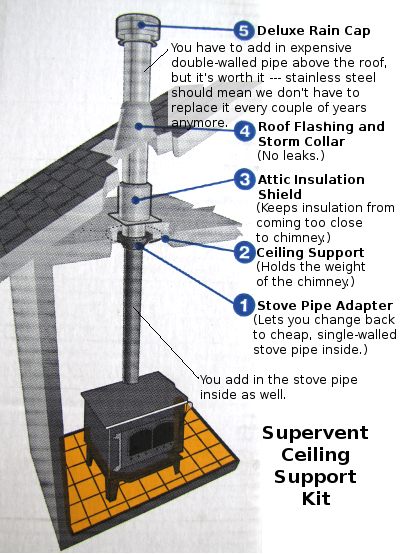
Ceiling support kit components
 We've been guilty of somewhat
ramshackle construction around our wood stove in the past ---
permissable since it was an exterior wood
furnace.
But since we're going to be putting our
new darling in the trailer (or
at least in a tiny addition on the side of the trailer), we decided to
pay the extra money and toe the line.
It probably goes without
saying, but I highly recommend that you not
buy your chimney setup from the wood stove store. The prices they
quoted us on getting smoke from the stove to the outside air were about
twice what we later found for the same products at Lowes (where Mark snagged a
10% discount as former military.)
Instead, start with the Supervent Ceiling Support Kit and you'll just
need to add in black
stovepipe, a damper, and a bit of sealant between the stove and the
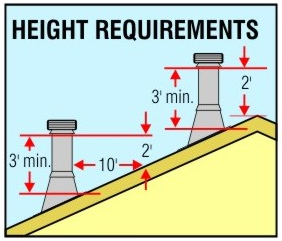
ceiling and a double-walled chimney pipe to extend three feet
above the local roof (and two feet above the highest point within 10
feet on the roof.) Total cost for the chimney assemblage, done
the right way, was $261.
 This year, one of our
financial goals is to sink any extra cash into long term farm
infrastructure which will make our bills lower in the long run and
which will (hopefully) last for many years to come. If that
hadn't been our goal for the year, I might have been tempted to cobble
together some of the elements in the ceiling support kit from cheaper
components. For example, you can reproduce the double-walled
chimney pipe ($62) by sliding your six inch chimney pipe inside an
eight inch chimney pipe of the same length and filling the gap with a
non-flammable insulation like ceramic strand insulation or a welding
blanket. The attic insulation shield (part of the $158 kit) can
be made just as easily by cobbling together a box two inches away from
your double-walled pipe out of basic lumber. But for amateurs
like us, the extra cash was worth it since it's helping us piece
together the proper way to build a chimney out of pipes.
 Edited to add:
I summed up everything I
learned about installing a wood stove in a mobile home in Trailersteading, which is now available for
$1.99 on Amazon. I hope you enjoy reading it as much as I enjoyed
writing it!
Want more in-depth information? Browse through our books.
Or explore more posts by date or by subject.
About us: Anna Hess and Mark Hamilton spent over a decade living self-sufficiently in the mountains of Virginia before moving north to start over from scratch in the foothills of Ohio. They've experimented with permaculture, no-till gardening, trailersteading, home-based microbusinesses and much more, writing about their adventures in both blogs and books.
Want to be notified when new comments are posted on this page? Click on the RSS button after you add a comment to subscribe to the comment feed, or simply check the box beside "email replies to me" while writing your comment.

Now that you are moving the stove indoors, there are two additional things you should invest in;
@Fostermamas:
Have you looked at the Jotun website? They have manuals for all stoves in PDF format. As Anna says, the draft in the chimney is very important. If you twist a piece of newspaper, put it in the empty and cold stove and light it, does the smoke go into the chimney? If not, there's not enough draft.
@Anna:
I was browsing around at the instructables website (looking at this wood-frame bicycle) when I found this DIY gasifier stove.
Basically it is a wood stove for cooking with forced ventilation and an afterburner to burn the particles in the smoke.
The construction of a rocket stove is mostly meant to create a strong draft.
Have you even been to a blacksmith, and seen how hot a fire with forced ventilation through the bottom can get? That is what the holes in the bottom of the inner pot are for. This is the primary air.
Wood fires tend to give smoke under certain circumstances, which are really unburnt hydrocarbons evaporating from the wood. Generating a fire that evaporates the hydrocarbons quickly and then adding extra oxygen (secondary air, through the holes around the top of the inner) makes sure the smoke burns completely, giving a cleaner and more efficient fire.
This stove does more or less what a gasifier does; generate flammable gas by incomplete combustion of wood. Of course in a "real" gasifier you'd use less primary air to generate as much "wood gas"/syngas as possible, and you don't burn it off immediately like in a stove.
For more details, check the gasification article on wikipedia.