How to install an exterior wood furnace
 The cheapest house you'll ever find is an old
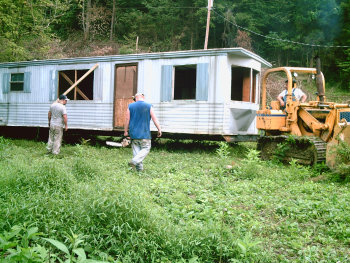
trailer. Ours is 10 feet by 50 feet and we got it for free,
though it cost us $2,000 to haul it onto our land. (That figure
included a good bit of driveway building then dragging the trailer
through the floodplain with a dozer.) We recommend the old, free
trailer approach to anyone who wants to live simply on the land.
With our housing now taken care of for $200 per year in real estate
taxes, it was time to decide on a method of heat. The problem
with trailers is that they are fire traps --- a wood stove (which is
often the most economical and also one of the best environmental
options) was out of the question.
So, for winter #1 we heated with electric space heaters, keeping the
room temperature hovering a bit above freezing and still spending up to
$126 per month on our electric bill. We couldn't help also being
concerned about the environmental cost of using excessive electricity
derived from coal. That winter was a bust.
 One solution would have been
to insulate the trailer, but we're striving for cheap here, and
trailers are expensive to retrofit. Instead, we chose to install
an exterior wood furnace. There are a bunch of options out there,
most of which involve water flowing around a stove and being pumped
into your house, but we didn't have running water at the time and were
going for easy anyway, so we chose an air-flow model. Mark's mom
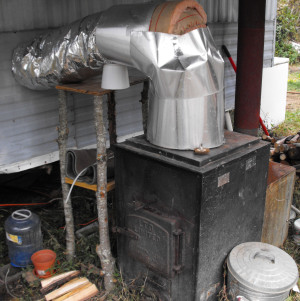
found the furnace you see here for a bit over $200 on ebay.
Installing the furnace was simple --- Mark dug out a bit of earth and
put down cinderblocks, then set the stove on top. An insulated
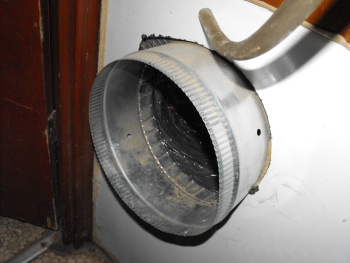
air hose went from the top of the stove into the trailer, and a similar
hose went from the ductwork already in place under the trailer back to
the stove. (Mark had to rig a homemade version of the insulated
air hose this year out of  insulation and flashing since
Huckleberry used the hose as a bed all summer and ripped it up.)
A fan, which came with the stove, keeps the air circulating --- hot air
comes into the house and cool air comes out. For winter #2, our
electric bill went down to $60 to $70 per month. That paid for
the stove in the first year --- and we were toasty warm!
A couple more notes on installation are in order. When we first
put in the stove, we tried to blow the hot air through the barely
insulated, under-house ductwork and up through vents all through the
trailer. That didn't work. You want to use the tendencies
of hot and cold air in your favor --- blow all of the hot air into the
house as quickly as possible, then suck cold air at floor level back to
the stove.
 It's not necessary to build anything around
your exterior wood furnace, but our standard of living went up when
Mark put in a porch-type roof over it. It gave us a dry place to
store a couple of days' worth of wood and also means that we don't have
to stand in the rain when we feed the stove.
The wood is easy to come by (though it keeps Mark in shape during the
winter sawing it into lengths and both of us in shape splitting
it.) The powerline cut has so much deadwood in it that we expect
it'll last us for another four years at least. We're thrilled
with our heat setup and see it as yet one more step in our path to
total independence.
Want more in-depth information? Browse through our books.
Or explore more posts by date or by subject.
About us: Anna Hess and Mark Hamilton spent over a decade living self-sufficiently in the mountains of Virginia before moving north to start over from scratch in the foothills of Ohio. They've experimented with permaculture, no-till gardening, trailersteading, home-based microbusinesses and much more, writing about their adventures in both blogs and books.
Want to be notified when new comments are posted on this page? Click on the RSS button after you add a comment to subscribe to the comment feed, or simply check the box beside "email replies to me" while writing your comment.

How do you keep the smoke out of the trailer? It looks like some of it would go up the duct into the trailer and smoke things up. I see the other pipe out of the back of the wood burner, but still... Is there a separate chamber for heat to go in and out of that's closed off from the burning chamber?
How long does a load of wood burn during the winter? Can you load up before bed and stay toasty all night?
Great solution!
The furnace is a little more complex than a simple wood stove. It has
an air pocket outside the main part of the stove which heats up due to
the fire but doesn't interact with the fire and thus doesn't get smoky.
We use a fan to push air through the pocket and into the trailer, and then pull air out of the trailer to go back into the pocket. Thus ---
no smoke!
Mark usually gets up once during the night to poke at the fire, though
I've noticed that as he gets better at loading the wood in at night, that isn't as necessary. On the nights he sleeps through, there are usually enough coals left to get a good fire going pretty quickly. It
helps to burn denser woods like walnut (or oak) at night so that the wood lasts longer.
The house temperature does drop at night, but we figure as long as it's above 50 F, that's warm enough for sleeping!
This is one of the best diy'er sites ive seen from normal down to earth people ive come acrossed yet! Come here looking for chicken care(since I am a first timer with chickens),about 8:30pm and now its 2:00 am. Every time I think ive got what I came for I see another subject that catches my interest. Your now on my favorites list:). Most of your ideas are so simple and practicle,and within reason for low income households.Cant get enough of your plight to be self efficiant.Im jealous, you have each other to work as a team. It really helps to have your spouse seeing things the same as you.. going to seriously check more into out side furnaces. I will be ordering 1 or 2 of your chicken waterers wihtin the next month, Im tired of the slimy hay filled floor waterers. Anyways just thought i'd say what i was thinking. Thanks to both of yas.
We got our trailer for free, and I figure it's worth a few hundred dollars at the most, so we don't have it insured....
The furnace seems to be a safe distance away from the trailer, though. We never have sparks flying. At the worst, a charred log might drop out the furnace door onto bare dirt, but that goes out quickly and is far from the trailer.