Training tall spindle apples during year 1
 The first set of dwarf trees
for our high density apple planting has arrived! (We ordered from
two different nurseries, so a couple more trees are yet to come.)
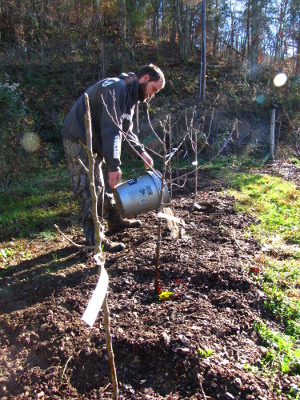
After soaking the roots all morning, Everett and I put them in the
ground...and then I pored over websites to figure out how to prune and
train my new trees.
The North
Carolina Cooperative Extension Service warns:
"Although
high-density systems have many advantages, summer training and pruning
must be conducted approximately every 4 to 6 weeks during the growing
season. High-density systems are not like traditional systems
which can be 'corrected' after a period of neglect. When
high-density systems are neglected during the growing season, tree
structure, early fruiting, and potential orchard profitability are
lost."
In other words, this isn't a guess-and-try-again system. I need to have all my ducks in a row from the get-go if I want to eat homegrown apples in 2014.
Understanding the goal
 Although this post is really
about how to prune and train high density apples for their first year
of life, it's always essential to understand the final form you're
looking for. If left to their own devices, dwarf apple trees can
grow 10 to 15 feet tall and 12 to 16 feet wide, spending lots of energy
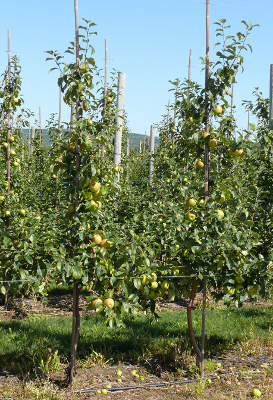
on vegetative growth and not fruiting for several years. Our goal
is to create a tree that tops out at 8 to 10 feet tall, fruits the
second year after planting, and doesn't bother its neighbor three feet
down the row.
Although this post is really
about how to prune and train high density apples for their first year
of life, it's always essential to understand the final form you're
looking for. If left to their own devices, dwarf apple trees can
grow 10 to 15 feet tall and 12 to 16 feet wide, spending lots of energy
on vegetative growth and not fruiting for several years. Our goal
is to create a tree that tops out at 8 to 10 feet tall, fruits the
second year after planting, and doesn't bother its neighbor three feet
down the row.The perfect high density apple tree is a lot like a normal central leader tree, but more compact. Branches start 24 to 32 inches off the ground and continue to the top of the tree, spaced only about six inches apart and growing no more than four feet long. After three to five years, some of these branches may need to come out, but we're not worrying over that during year one.
In order to support the weight of apples (and to keep the tree upright on nonvigorous rootstock), a permanent stake or trellis must be attached every 15 to 24 inches along the entire trunk. We're still deciding what to use for our support, but the main choices among large-scale orchardists seem to include 10 foot lengths of one inch metal pipe (or a slightly larger treated wooden post) sunk two feet in the ground, or hefty trellises.
Pruning and training the new tree
 Okay, now that the big
picture is firmly engrained in our minds, let's look at what we want to
do to our tree during its first year of life. I've written
previously about planning
out the orchard, so
let's assume your trees are in the ground, with the graft union three
to four inches above the soil surface, and staked in some way.
Okay, now that the big
picture is firmly engrained in our minds, let's look at what we want to
do to our tree during its first year of life. I've written
previously about planning
out the orchard, so
let's assume your trees are in the ground, with the graft union three
to four inches above the soil surface, and staked in some way.The North Carolina Extension Service has another relevant admonition for this early stage: "Research has shown that any pruning of young trees will reduce or delay fruit production early in the life of the orchard." In other words, even though our main goal is to keep these trees small, we don't want to cut away much (if any) wood --- instead, we're focusing on training to keep the tree in line. The only branches worth cutting are damaged, are located less than 18 inches above the ground, or are more than half the diameter of the main trunk. (If you didn't spring for a well-feathered tree and are instead starting with an unbranched whip, you'll have to do some cutting, but that's a topic beyond the scope of this post.)
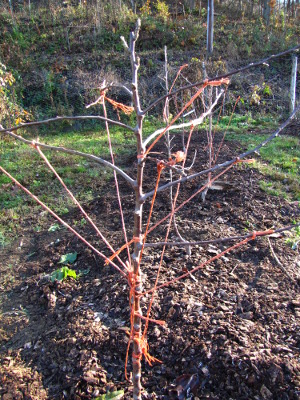
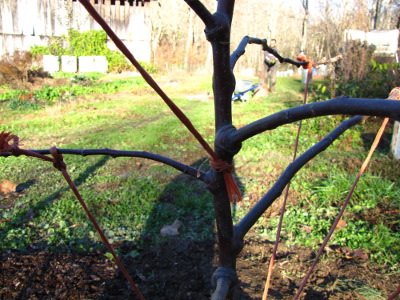
While your pruning shears are verboten, you do need to commit to training the tree right away and then monthly throughout the summer. Using toothpicks, clothespins, and/or tie-down strings, you want to spread all side branches down close to horizontal right away, then continue to spread them (and any secondary branches) level throughout the year.
 Different sources recommend
different final orientations, ranging from just above horizontal to a
bit below horizontal. Usually, more vigorous trees and those
planted closer together have their branches pulled lower, which serves
to "calm" the tree --- meaning that the leader grows tall, but the side
branches spread more slowly and focus on making flower buds instead of
vegetative growth. Regardless of which orientation you choose to
train to, you want to keep an eye on new twigs all through the summer
and pull them downward then they reach three to four inches long.
Different sources recommend
different final orientations, ranging from just above horizontal to a
bit below horizontal. Usually, more vigorous trees and those
planted closer together have their branches pulled lower, which serves
to "calm" the tree --- meaning that the leader grows tall, but the side
branches spread more slowly and focus on making flower buds instead of
vegetative growth. Regardless of which orientation you choose to
train to, you want to keep an eye on new twigs all through the summer
and pull them downward then they reach three to four inches long.Since flower buds on apples are formed in July, it's essential to give your trees lots of love right away if you want fruits their second year. That's why we're planting in fall and committing to water starting with the first spring dry spell, hoping for early fruits. If you don't live in a wet-winter area, you might want to water all winter long.
Maintenance training and pruning
For now, we'll have plenty on our plates keeping our new dwarf trees happy and in line, but we also need to look ahead to the future. By the end of their second year, the trees should be about eight feet tall, at which point we'll need to choose a method of slowing their upward yearnings without promoting vegetative growth. This website gives a great year-by-year tutorial on planting and maintaining high density apples, and I'll be referring back to it frequently in the years ahead.
Our chicken waterer is the low
maintenance solution to chicken-care, allowing you to spend time on
fiddly dwarf apples.
Want more in-depth information? Browse through our books.
Or explore more posts by date or by subject.
About us: Anna Hess and Mark Hamilton spent over a decade living self-sufficiently in the mountains of Virginia before moving north to start over from scratch in the foothills of Ohio. They've experimented with permaculture, no-till gardening, trailersteading, home-based microbusinesses and much more, writing about their adventures in both blogs and books.
Want to be notified when new comments are posted on this page? Click on the RSS button after you add a comment to subscribe to the comment feed, or simply check the box beside "email replies to me" while writing your comment.

My parents made a grape trellis that may easily adapt to work for your trees. Instead of using tensioned lines they put T posts between plants and used EMT conduit as the "wires" to train the grapes too. This may be a cheap option if you already have the T Posts.
I was wondering if any of your trees are Tip bearers or if this training method is better for spur bearing varieties?
Brian --- I like your trellis option --- it sounds a bit like what Mark's envisioning. (We got stuck at the idea of getting high enough off the ground to pound a 10 foot stake of any kind in, so we like the idea of starting with a T post.)
I've only ready some on tip bearing vs. spur bearing, so I can't definitively say that this will work for both. However, since you don't really prune out much wood, I'd think it would --- you won't be removing the tips or spurs to shorten branches, just training so they naturally stay short. Since I'm trying out several varieties, I'm sure I accidentally got some tip-bearers and some spur-bearers. I'll report back in a few years if it seems to make a difference.
Hi Anna, We currently grow apples on a tall spindle system in Oregon. Just curious if you're training your apple trees the same, whether they are tip bearers or spur bearers. We have some that are both and tip bearer only. Cheers! Diane