Propagating persimmons: Germinating seeds, grafting, and transplanting
 If you haven't already,
please read my previous post to learn about persimmon
spacing, varieties, and other factors to consider when planning your
persimmon orchard.
This post is a quick rundown on three methods of persimmon propagation.
Starting
persimmons from seed.
The cheapest (and probably least problematic) method of growing
persimmons is to gather seeds from wild trees and sprout them right
where you want your own persimmon to grow. I've had mixed success
with sprouting persimmon seeds, but I now know that if you use a couple
of tricks, your persimmons will germinate quite well. First,
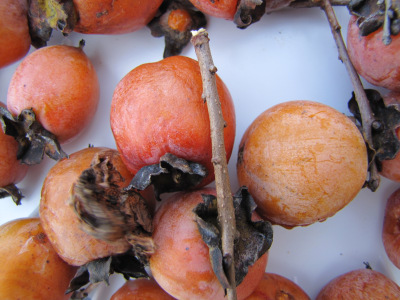
gather whole persimmon fruits and remove the seeds, but don't let
the seeds dry out.
Your seeds will need to stratify,
so plant them in fall or winter, no more than an inch deep in the
soil. Persimmon seeds won't germinate until late spring, so if
you want to be able to keep track of them, you might try planting your
seeds in outdoor pots at this time of year, then transplanting them
into their final location as soon as they germinate and before they
send down their long tap root. If you choose the pot method,
plant your seeds in soil taken from the woods to promote germination.
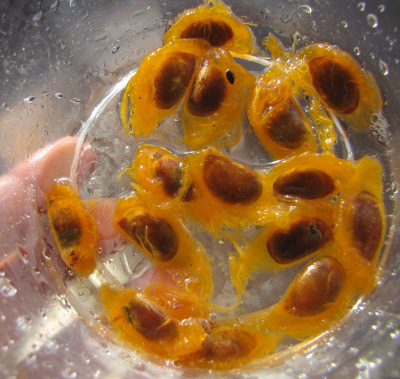
 As I cleaned my first batch
of persimmon seeds, I noticed that a layer of pulp continued to cling
to the seed, so I'm experimenting with whether persimmon seeds also
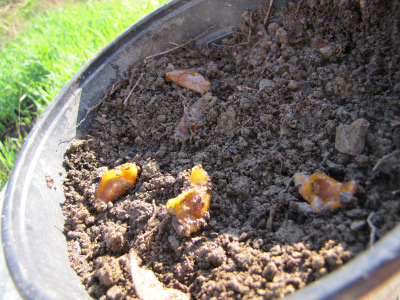
need a fermentation stage. I planted half of my seeds
directly into pots of woodland soil, and am letting the other seeds
soak in water for a week or two the way I do with tomato
seeds. I'll
report back this spring about which method gave me better germination
rates.
Grafting
persimmons.
Starting persimmons from seed is relatively easy, but your final tree
may or or may not be exactly the way you want it to be. You can
develop your own, locally adapted persimmon varieties by setting aside
a patch of land to test out dozens of different seeds. The
persimmons in your test strip can be planted much closer together since
you just need them to grow to about five feet tall, at which point they
will begin to fruit. Select your favorite varieties from this
test bed (maybe an early, mid-season, and late tree?) and graft scion
wood onto seedlings started at the same time in their permanent
location. I won't go into the basics of grafting here, but I've
read that persimmons can be grafted using the same methods you would
use to graft apples.
 Transplanting persimmons.
If at all possible, it's best to plan your persimmon orchard so that
you don't need to transplant. However, if for some reason it's
essential to move a persimmon from one spot to another, orchardists
have developed a method that is time-consuming but which seems to work.
The best time to
transplant is at the beginning of the third growing
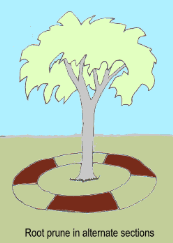
season. To prepare, prune the roots the previous summer by
digging your spade into the soil a few inches from the trunk of the
tree in alternating sections, as is shown in the image to the
right. Two months later, repeat the process, cutting into the
areas that were left uncut last time. This process will make your
persimmon grow roots close to the trunk where you'll be able to dig
them up (although you'll still lose the taproot.)
During the next dormant
season, lay out black plastic in the area you
plan to transplant into. This will warm the soil up so that when
you transplant the persimmon in early spring, it is ready to grow
immediately. Prune back the top of the tree extensively so that
only half to a third of the branches remain, then transplant the
persimmon into its new location. Keep the persimmon very well
waterered until mid summer --- a flush of growth right off the bat
doesn't mean that your tree is established and can be ignored. If
your persimmon is still alive, stop watering in August to let it harden
off for the winter.

After reading all of
that, you probably think, like I do, that it's
best to just start seedlings! I'm currently gathering seeds from
persimmons that ripen at various times, with the goal of putting some
directly into the forest pasture in the spring and others into a test
strip for later grafting onto male seedlings in the pasture. Like
many parts of my forest pasture
experiment, growing persimmons is a
long term project, with seedlings slated to bloom in four to eight
years and then the grafted persimmons not beginning to fruit until
three years after that. Maybe by 2020, persimmons will make up a
significant portion of our chickens' diets.
| This post is part of our Persimmons lunchtime series.
Read all of the entries: |
Want more in-depth information? Browse through our books.
Or explore more posts by date or by subject.
About us: Anna Hess and Mark Hamilton spent over a decade living self-sufficiently in the mountains of Virginia before moving north to start over from scratch in the foothills of Ohio. They've experimented with permaculture, no-till gardening, trailersteading, home-based microbusinesses and much more, writing about their adventures in both blogs and books.
Want to be notified when new comments are posted on this page? Click on the RSS button after you add a comment to subscribe to the comment feed, or simply check the box beside "email replies to me" while writing your comment.

So I never really say much useful here other than gush praise but ok, let me do that much... Again, I LOVE that you (and the other readers) talk about common sense things like putting human urine back into the ecology of your immediate surroundings, finding and using seeds in scat -- not because it's trendy but simply because it works. That's the ultimate conservation and efficiency, resilience, treading lightly. Maaaaaan...city life is like life on Mars!
Brian --- That's odd --- I've never seen damped off plants resprout. Is it possible that they got frost-bitten not damped off?
(Thanks for the timely reminder that I need to get all of the seeds I've been saving this winter into pots.... )
)
We didn't have frost that damaged them and I have a photo (sort of blurry) that I added some notes too showing some that made it and others that had damped off in the same pot. I found another that is sprouting from a damped off stem and I'll see if I can get a good photo of it and see how it grows.
http://www.flickr.com/photos/20378685@N00/7024640969/
We planted 9 pawpaw seedlings so far (of the 12 that germinated) and we just planted a named variety so we can take advantage of the shady parts of our yard for fruit production.
The persimmons will remain in pots and hopefully they will be big enough to use for grafting on a Japanese persimmon top.
Here's the photos I promised it shows two little stumps that are trying to regrow (even after I pulled the tops off the first time because I thought they were weeds.) http://www.flickr.com/photos/20378685@N00/7328744192/in/photostream/
And here are some Close-ups: http://www.flickr.com/photos/20378685@N00/7156088165/in/photostream/ http://www.flickr.com/photos/20378685@N00/7341289054/in/photostream/ http://www.flickr.com/photos/20378685@N00/7156087235/in/photostream/
The first one I weeded and pulled the roots out of and figured out it was a persimmon seedling had a very healthy thick root system. I don't know if this seedling will be very healthy but it will be interesting to see if it even survives the first year.
I too was having very low success rate germinating persimmon seeds. About 2 in 50 would sprout. So in late fall of 2016 I collected some ripe persimmon fruit off the ground. And I picked up some, old dried seed that was on the ground probably from the previous year. I scarified some seed in vinegar for 12 hours, then put them in a lye solution for one hour, then rinsed them, finally gave them a plain water soak overnight (about 12 hours). Then I stratified them in layered soil; first 1/2 inch of sand, then a 1/2 inch of potting soil, finally a top layer of 1/2 inch of dried sphagnum moss. The seeds were planted the second layer, laid in horizontally. Then watered enough show in the sand and the moss was saturated with water and slightly wrung out. Then into the fridge for 4 months. I removed them on March 1st to put under my flourescent lights for germinating. Nothing happened for 3 months. I brought them into the kitchen for more warmth. Still no growth. So on June first, I put the little container with the stratified soil and seed in my side porch. It faces west with 3 glass storm windows. It gets to 90-100 degrees in spring and summer, very warm, good for germinating seeds needing high heat like cleome and swamp milkweed and apparently persimmon seeds. After 1 week of tending the persimmon seeds keeping them watered and such, I forgot about them. The soil had dried some. I watered them again and put the lid on the container. (The container is a clear,plastic one pint food container). A week later I found one seed had sprouted and the 3 inch long seedling was bent badly being trapped under the lid. I gently dug out the long root and the planted the little seedling in a single pot in fresh potting soil. I put the stratifing container back on the window sill to get more of that intense solar heat. Inside the container I took a temperature of 90 degrees. Much to my surpise after a few days, there were 5 persimmon seeds sprouting all in one corner of the container. I gently uncovered the seed cases to make it easier for the sprout to lift it. I put another square plastic upside down on top of the growing container, making a miniature greenhouse. Again I took the temperature, 90 degrees inside this little greenhouse. Two seedlings are now erect, lifting the seed coat vertical. They like the heat. I expect the other three seedlings to start growing vertically very soon. After the cotyledons show and 2 true leaves grow, I'll transplant to single pots with potting soil. Then under the grow lights for a week then outside to harden off, then set out to grow on.
Hi! I'm traying to germinate some persimmon seeds... And thanks to this blog, now I know that they really take a lot of time... I didn't even know that a seed could take so long! And less knew about that some seeds could be even weeks soaking in water! I thought that after 48 hours they were ruined...
So I'm really wondering about what happened with this: "As I cleaned my first batch of persimmon seeds, I noticed that a layer of pulp continued to cling to the seed, so I'm experimenting with whether persimmon seeds also need a fermentation stage. I planted half of my seeds directly into pots of woodland soil, and am letting the other seeds soak in water for a week or two the way I do with tomato seeds. I'll report back this spring about which method gave me better germination rates."
Please let me know, which is the best method?