
Pondering creek crossing options
 Several of you have expressed an interest in Farm Goal
'10's "Revisit the creek crossing." I'm always interested to
see what clever ideas people come up with, especially while we're in
the planning stages. (We'll be in the planning stages for another
couple of months until the water warms up.) So here's some extra
info to get those creative juices flowing.
Several of you have expressed an interest in Farm Goal
'10's "Revisit the creek crossing." I'm always interested to
see what clever ideas people come up with, especially while we're in
the planning stages. (We'll be in the planning stages for another
couple of months until the water warms up.) So here's some extra
info to get those creative juices flowing.
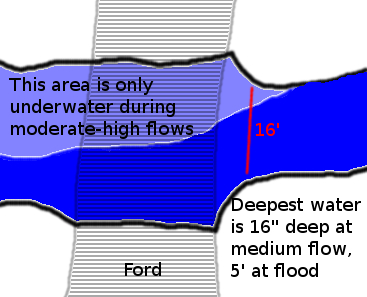
The drawing here is a top view of the creek crossing area. As you
can see, the creek is relatively shallow a lot of the time, but
regularly rises to 16 to 20 inches after normal rains. About once
a month, it rises to the top of (and over) its approximately five foot
high banks, at which point it washes away anything that isn't securely
bolted down.
 Creek crossing 1.0 is a cinderblock
ford that still works perfectly for its purpose --- getting
vehicles across the creek when the water is no more than two feet
high. However, we really only drive across the creek a few times
a month. This year's priority refers to the much more frequent
times that we walk across. Just so you know, we don't want a big,
fancy bridge to drive across --- we like our moat.
Creek crossing 1.0 is a cinderblock
ford that still works perfectly for its purpose --- getting
vehicles across the creek when the water is no more than two feet
high. However, we really only drive across the creek a few times
a month. This year's priority refers to the much more frequent
times that we walk across. Just so you know, we don't want a big,
fancy bridge to drive across --- we like our moat.
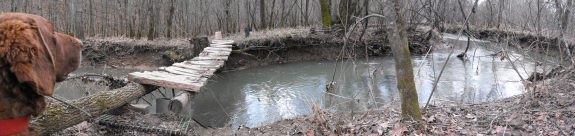
Creek crossing 2.0 was a
footbridge that we built from trees felled on the property. It
lasted for about two years, and was nearly perfect. The only flaw
was that everyone except me, Mark, and my mom refused to walk across it
because the five foot drop below it terrified them. Wimps.
:-) One option would be to rebuild a similar footbridge, but
actually spend a little bit of money for treated lumber and add a
handrail. To deal with high water, it would probably need to be
about twenty feet long.
 Creek crossing 3.0 consists of three
cinderblocks placed along the edge of the ford. When the water is
only a foot deep (80% of the time), these are actually one of the best
crossing options. You hop from block to block and keep your feet
dry. They can be a bit wobbly, but folks seem to be less scared
of them than of the footbridge. They do wash away during floods,
though.
Creek crossing 3.0 consists of three
cinderblocks placed along the edge of the ford. When the water is
only a foot deep (80% of the time), these are actually one of the best
crossing options. You hop from block to block and keep your feet
dry. They can be a bit wobbly, but folks seem to be less scared
of them than of the footbridge. They do wash away during floods,
though.
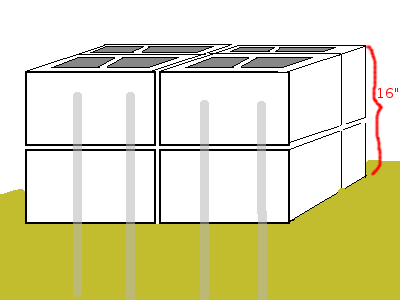 One option we're considering is building a
more high tech version of creek crossing 3.0 --- cementing stepping
stones to the bottom of the creek using rebar and making them two
blocks high to accommodate higher water. Or perhaps three blocks
high with half of the bottom block sunk into the creek bottom.
Not sure if we'd need to make the stepping stone four blocks in
diameter like this drawing to make people feel comfortable or just two.
One option we're considering is building a
more high tech version of creek crossing 3.0 --- cementing stepping
stones to the bottom of the creek using rebar and making them two
blocks high to accommodate higher water. Or perhaps three blocks
high with half of the bottom block sunk into the creek bottom.
Not sure if we'd need to make the stepping stone four blocks in
diameter like this drawing to make people feel comfortable or just two.
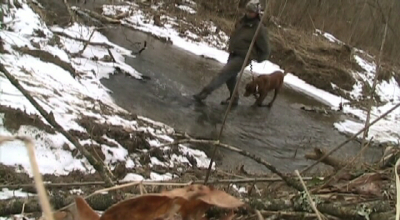
There's also a log spanning the creek that we shimmy across when
desperate to get in or out during extremely high water. This is
vastly suboptimal, and we've considering replacing it with two ziplines
--- one to take you across the creek and the other to take you
back. When I started researching ziplines, though, they looked to
be out of our price range for our current creek crossing plans.
I'm not interested in spending more than $100 on the creek right
now. Plus, clearly the folks who wouldn't walk across the
footbridge are unlikely to brave a zipline, so we'd have to create an
alternative option anyway.
So, what do you think? Bridge, stepping stones, zipline, or
another option entirely? I'd love to see links to other websites
where people have installed low cost creek crossings. Just keep
in mind that anything less than five or six feet off the creek bottom
will be washed away unless extremely securely attached.

Or explore more posts by date or by subject.
About us: Anna Hess and Mark Hamilton spent over a decade living self-sufficiently in the mountains of Virginia before moving north to start over from scratch in the foothills of Ohio. They've experimented with permaculture, no-till gardening, trailersteading, home-based microbusinesses and much more, writing about their adventures in both blogs and books.
Want to be notified when new comments are posted on this page? Click on the RSS button after you add a comment to subscribe to the comment feed, or simply check the box beside "email replies to me" while writing your comment.
I saw a great one last week near Bat Cave, NC. someone had gotten a junked flatbed tractor trailer and had it placed over their creek...instant heavy duty bridge.
Another simple walking bridge is to go to the metal recycle yard and ask them to save a 20 ft. ladder when they get it. Wood planks can be placed on the ladder.
Possibly you could find or make pontoons? I don't know how flooded the banks get, on either end of the current foot-bridge. Also, I don't know what you could do in a flood, to keep the pontoon (or floating) bridge from being skewed (tho possibly you could have piers on either bank, to raise the bridge up (by means of a crank and tackle on each bank. Tho, if you did have this ability to raise the bridge, you might be able to not have the floating bridge...) Which bring to mind a drawbridge system, which takes up each side, so a bigger boat (in this case, flood) can get through. The advantage of a draw-bridge is, you can operate it for only the company you want.
At our old Farm, we finally had those metal barrels, that the creek went through, but for you, if you used barrels like that you would have to have them at least 2 layers high, bolted together, anchored down, etc.
I personally hope you can figure out a foot-bridge, not the steppingstones, unless you actually put the "steppingstones" inside the metal barrels (with the openings facing up and downstream), and some kind of platforms on top of the barrels, for folks like me who need a bigger perch. Could you build piers on either bank, to hold up a modified drawbridge from each bank, without causing the flooded creek to wash out those banks and piers??
I kind of think that bridging a creek might be an area that the county Extension Service might have expertise on (you might even get some $ help, not for a state-mantained swinging bridge, but maybe for an engineer). I bet if you talked it over with ASD they could help...The whole reason you need a better way in and out is to be able to plan for being able to come and go as needed, so your place is more "viable". Steve might know of somone to trust, in Scott Co.
great to be trying to plan this!--love, mom
You all are awesome! Here are some extra comments/questions for you:
Moontreeranch --- I like your idea of how to build a pier in the middle of the creek, but I've been on the fence for quite a while about whether any pier in the creek would hold up under flood conditions. When it floods, we regularly get medium-sized trees washing down the creek and they will lodge against anything in the middle like that. Have you had experience building a pier like that? How strong is it? Would it hold up to being battered by a tree every month or so?
Shannon --- suspension bridges are certainly elegant and people do use them a lot around here, which suggests they might fit the bill. I'll have to do some more research on how much it would cost to build one. I've always assumed it was outside our price range, but I could be wrong...
Dudley --- I forgot to mention in my list that we'd actually considered an option a lot like your option 1, but with the frame of a mobile home. Mark found one that he could get cheap. Unfortunately, the concept of hauling it seemed out of our league! Your ladder, on the other hand, sounds really cheap and just our cup of tea --- intriguing!!
Mom --- Actually, your ideas are a bit like another idea we'd floated but decided would be too complicated. The Forest Service sometimes makes footbridges in locations like ours that are meant to float free of their support on one end during high water and swing downstream so that they don't get busted by trees floating by. We've also pondered a drawbridge --- an idea which I love for obvious, antisocial reason --- but I can't seem to wrap my mind around building a bridge that's light enough that it can relatively easily be raised up. (Maybe Dudley's ladder bridge?)
The barrels you mention don't work in our creek. The neighbor upstream put in those metal tunnels --- it took three to span the creek, and in the first big flood one washed out. They're just too much of a hindrance to the water.
Everybody --- I'd love to hear some more great ideas like these!
We do a lot of post hole buildings & structures here. Is your dirt firm enough for such? Also is a step not preferred, meaning you like to get a wheelbarrow or cart across? What is the width of your golf cart - just so I could do a dream width so you could compare costs? What's driving me crazy is I have 80% of what you need in my barn from Habitat ReStore for pennies on the dollar! Do you have a source for purchasing leftover construction supplies? My idea is based on I-Beams but they can't sit on the earth or they will rot. Also have a cheap & beautiful "railing" to make your visitors quite at ease...
Unfortunately, the dirt around the creek is soft, muddy silt. We had good luck getting the ford to stay in place by driving fenceposts and rebar through some of the blocks and cementing them in place with concrete, but along the banks even that is unlikely to be helpful as the water constantly undercuts the bank.
Steps are fine. We really don't want to build anything fancy (aka expensive and time-consuming) enough for the golf cart to go across --- it goes across the ford great. And when we want to wheel things across, we just attach them to the golf cart. Think foot traffic!
We got really lucky with finding some building materials for free at a similar type of place that you're talking about, but it was a one time thing. We haven't gotten lucky on finding other cheap building materials yet.
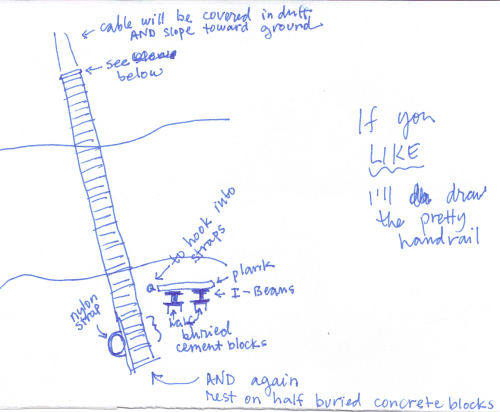
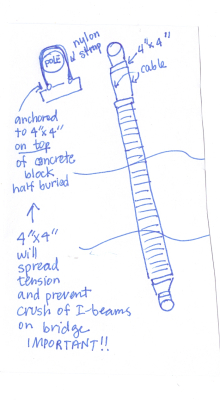
Okay - I see trees on opposite banks. What's the measurement from the left side of the close tree to the left side of the tree on the other side of the bank? I'm thinking strap anchors here on a concrete block base. They look hefty enough to be your "posts" for long lasting support.
Unfortunately, it just started pouring, so you'll have to bear with my guesstimate. Assume this has quite a bit of wiggle room in it --- I'm notoriously bad at estimating spatially.
I didn't mention it, but there is actually a telephone pole pretty close to the bank on each side of the creek --- the telephone company buried our line everywhere else, but came above ground to cross the creek. Those would probably make stronger supports than the trees (which are box-elders are pretty likely to fail over the long term.)
The distance between the telephone poles is where I get a bit hazy --- maybe 25 to 35 feet?
couldn't resist:)--mom
Titus --- that's where I was getting stuck on the telephone poles --- figuring the company might not be pleased with us screwing into them. But if you can figure out a way to strap onto them, that would be awesome!
The banks are high enough to pretty much avoid the highest flood level --- the water backs up a bit past there a few times a year, but it's slow water that won't hurt anything.
I think I may put on some rain gear and go measure for you. Stay tuned....
Titus --- Okay, so you're going to laugh at me. I did warn you that my guesstimates are often off.... It's actually 75 feet from pole to pole. I had forgotten that one of the poles is about 30 feet from the creek.
It might be possible to just use one of the poles and anchor the other end of the bring on some homemade post....
A park just outside DC has stepping piers across a creek which are big around as a bucket and three feet tall, poured out of concrete.
Kristin and I both walked on them and they didn't seem scary, because they were large enough on top. Did you walk there with me? It was just past the beltway, heading up toward Great Falls, VA.
The distance won't be daunting because your strapping will span the rest of the way to the far off pole, but in this case, I'd make sure to use galvanized wire and use a come along to make is just secure enough to not move, but not secure enough to play a tune. Your mom's video cracked me up! It's something I would have gone for completely if you had folks who tubed or paddled you creek on a regular basis! And what the telephone folks don't know won't hurt them. The duff is going to cover up most of what I'm planning. So how far past the closer pole to the river does the water rise? Now if the phone would just STOP ringing!
I only remember they were doable for an average person. On the other hand, the stream wasn't a likely to flood as yours, probably.
Titus --- Ooh, didn't think of attaching to the poles right at the base where no one would see it. Smart!
Actually, I don't think that the water goes past the poles, now that I've looked at them again. Well, it does when the entire floodplain backs up and it's underwater for another thirty feet in every direction, but that's just ponding and it goes down in a day or so.
I can't stop thinking about Shannon's concept of a swinging bridge. Since so many people in our area build swinging bridges in this our type of situation, I figure they must be onto something. My question is --- can they built for our under $100 and under 1 week's work budget?
The video I've embedded here made me feel that maybe we could build a swinging bridge relatively cheaply. I wonder whether the plastic rope would hold up over the long term. Other spots on the internet suggest using 3/8 inch galvanized aircraft cable or 1/2 inch stainless cable, but that might be overkill. I expect that the bridge itself will weigh less than 200 pounds and we wouldn't want to put more than 400 pounds of people on it at any one time. The aircraft cable may be overkill since a quick search of the internet suggests it would hold 12,000 pounds. Anybody got firsthand experience with making a swinging bridge? Is rope actually feasible? (We have a nearly unlimited supply of free rope...)
Aircraft cable can be had relatively inexpensively. On amazon, first search result turned up this:
250' type 7 x 19, safe working load limit: 840 lb. , 3" wide reel No. 51200
That 250' of cable would be $27 or so. You could go thicker, but I wouldn't really think it necessary. I would use that for the main support and then use some UV resistant rope (Hemp?) or some smaller cable for the vertical supports. You've got the lumber...
I found another spool of 7 x 19 aircraft cable for $80 that lists it's breaking strength as 7,000 pounds. So, 1/4 aircraft cable would do it...
Galvanized Steel Aircraft Cable Wire in 7x19 strand core Wire cable dimensions: 1/4" diameter x 250' long Weight 28.6 lb. Break Strenght 7000 lb
How long until you guys plan on doing this?
Here are some drawings Titus sent me of her bridge idea:

Thanks, Titus! I'm going to have to ponder these a while --- my brain is about done for the day.
I've done some of these for fun and yes rope will do it, but for longevity don't use a natural fiber unless it's hemp. AS for synthetics, you need to choose a rope that doesn't deteriorate in the sun. I'm a retired merchant marine officer & marlinspike seamanship is one of my fortes. The problem I see is that you don't have trees and you can't use the telephone poles for this. You'd have to auger in posts that go at least 6-10 foot deep to handle the stain plus anchor them. In the Rockies I would feel safe with 5 foot deep on both my posts and anchors, but with the soil you are describing...I just don't know. I've designed & built a bunch of rope courses as well and I'm coming up with similar issues. (Of course much of my rope course obstacles would freak out your guests even more than your existing bridge...) As for your railing, I have a hammock style weave on which you can train a nice water loving shrubbery to grow into from the banks on each side. You didn't think I'd let you get away without some decorative know work now did you?
Anonymous --- That's a lot cheaper for the cable than I thought it would be! It looks like shipping isn't exorbitant either --- the whole shebang would come to about $40.
Of course, Daddy pointed out to me on the phone that the most expensive part of a swinging bridge is probably the supports on either end --- they need to be pretty high and solid. But we might be able to use trees or something cheap. It looks like the swinging bridge is still in the running!
Meanwhile, Daddy called me and told me that he thinks our cheapest option would be to buy two used telephone poles and use them to span the creek. Quite possibly he's right. Or, he said, use smaller pieces of treated lumber to create an arched bridge --- the arch gives it stability.
As for time frame --- sometime in 2010, hopefully. If we're going to be working in the water, we'll probably wait until spring when the water is warmer (and hopefully lower.) If not, maybe sooner.
Titus --- I love your water-loving shrub idea.
I'll have to go look at all of the trees along the part of the creek I own. It almost sounds like if I found the right two sturdy trees, we could do the rope bridge, which would be awfully cool! It'd be worth a short walk out of our way in that case. Tomorrow, I'll go scouting for trees!
A suspension bridge might be interesting enough of a project to get me out to visit! If I plan it right, I might visit just to help with this. I'm stuck here for at least the next 5 weeks for a class though.
If you go the suspension bridge route, plan on two trees being the supports on either end, or it'll be a lot more work figuring out how to anchor the ends. If you have large enough trees, you can plan on going up fairly high, leaving a bit of an arch in the wire between the two... with a arch in the opposite direction for the planking level. So, it will look like two parabolas with the closest points being in the middle over the creek. This would give it a bit of stability and keep it from wanting to twist I think. Best would be four trees in the right positions, but i don't think you'd get that lucky....
Shannon --- We'd love to have you in on the project! We could probably even plan around it....
I think I'm following you just about everywhere, except I'm getting lost on the second parabola. I think you're saying that one is concave and one is convex, but I'm clearly missing something since a wire strung between two trees is going to sag down in the middle due to gravity --- how could it sag up? I think it must be passing my optimal brain time.
One more question (for both Shannon and Titus) --- about how big around would you want a tree to be to figure it's strong enough for this application?
And now, off to wind down and fall asleep. I'll check in on the conversation in the morning!
I could be wrong, but I think the concern about anchoring is if I can't find good trees and we had to use posts. Hopefully, trees would be anchored well enough by themselves!
Awake this morning --- finally et the reverse arch idea.
A properly built drawbridge is very easy to raise, by using a counteweight. These kinds of bridges are abundant here in the Netherlands. Follow the link for the Dutch term "ophaalbrug" for lots of pictures. Especially the smaller wooden ones are made so that they can be raised and lowered by a single person. Check out the websites of wedeka and wijma, two Dutch bridge builders. You won't understand the text, but there are lots of pretty pictures. If you have enough wood available on your property, building one is just a question of time.
As for foundations in soggy or muddy soil, you'll need to go to an underlying supporting layer. The solution is to drive wooden posts (piles) into the ground untill they will go no further. That means you'll have reached proper support. Cut off the piles below the water level, so they won't rot. The whole city of Amsterdam is built with buildings supported on wooden poles driven into the ground. E.g. the palace on dam square was built on 13,659 wooden piles. 350 years later, it's still standing.
You can then pour concrete over the ends of the posts to have a solid base for your bridge. If you can get someone with a pile driver to come by, that's a quick way to do it, but probably outside your budget. Small posts you can drive in with a mallet or a post-pounder. The Roman pile-driver (see the wikipedia article) also works well, but takes time to build and is slow. Some experimental archeologists in Germany built a replica of such a Roman pile driver to see if it had been possible to create bridges over the Rhine that way. On TV I saw it used to hammer what was essentially a whole tree trunk about a foot in diameter into a riverbed. It wasn't fast, quite impressive nontheless.
I think the simplest and cheapest solution is to build a pontoon bridge using 50 gallon drums (floating on their sides as pontoons), synthetic rope and some planks. Just lash them together with the rope. Anchor it firmly on one side, e.g. to suitable trees, and the other end lightly. So if an uprooted tree comes down the creek, it might sweep the bridge away but won't destroy it. A slightly sturdier version is to weld flanges to the drums with bolts running through the flanges and fixed to the planks with omega clanmps. The puspose of this construction is to make the whole thing sturdy but flexible. Of course the steel drums will eventually rot, and you'll need to replace the rope every now and then.
Remember that load-carrying ropes will experience forces way higher than the weight of the load! Suppose a 200lb person is standing in the middle of the bridge. The ropes will then hang in a wide v shape. Suppose the ropes have a one in five slope (one foot up for for five horizontal). The ropes will then have to carry a tensile load of slightly over 500lb. If the slope is one in ten, it's a 1000lb load. That's not much for good-quality rope; 10mm nylon climbing rope can have a static breaking strength of around 4000lb, but much less for dynamic loads. But I would advise you to use at least a safety factor of 10, because the strength of rope decreases as it ages, and you'll have to take in account dynamic loads. And remember that knotting a rope can reduce the strength by as much as a factor of four! It's much better to splice rope. Google 'rope splicing' and you'll find lots of instructions, with pictures.
As for tying down the ropes, I'd go for solid 3 inch wooden fenceposts hammered 2-3 feet deep into the ground at 30 degrees from vertical away from the load. Slip the spliced loop around the post at ground level, and raise the rope over another post. But not more that 30 degrees from horizontal, so that the rope will never slip from the anchor post. The reason for doing this instead of e.g. tying around a tree is that you can test how many posts you need. Have a friend with a tractor or pickup come over and try to pull a testpole over. If the rope breaks before the pole pulls out of the ground, you're good.
With a tree you'll never know how strong it is until it falls down on you while you're crossing your bridge.
The simple suspension bridge article on wikipedia has some nice pictures. Note how the Soderskar bridge in the picture is hanging on two steel cables that look about an inch thick! Of course you don't have to go so complicated. The Inca's have been building grass rope bridges for centuries. Note that they only last about a year, though.
Hi,
Please find attached a sketch for a bridge as atensegrity1 structure. I'm emailing this because I don't think the comment box allows for adding pictures.
Basically the structure consists of a wooden arc, with the ends held together with a steel cable. The wooden arc is then loaded in compression, and the wires are loaded in tension. No load (save from the weight, of course) is transmitted to the environment.
The reason for using a structure like this is twofold;
1) It doesn't need a lot of infrastructure; the environment only needs to support the weight, it doesn't need to absorb stresses like when using suspension bridge, or a normal arced bridge, see the sketch.
2) It uses the materials efficiently. Wood is stronger in compression than in tension (Low-grade wood is about twice as strong in compression as in tension) , while (steel) wire is excellent at withstanding tension, but not compression.
Because it is nearly impossible to find nicely curved wood of sufficient length, I propose to make it as a glulam2 beam. You can find design data for the US on the AITC3 website, under technical information.
Basically, you start from thin boards, about 3 inches wide. How thin they need to be depends on the type of wood and the radius of the curve you want to make. I guess 1/8 to 1/4 inch. You make a template with the desired curve. You start with three boards as long as your template, and one half as long. Spread glue between the three layers as shown in the scetch, and clamp them down with C-clamps. If the glue has set, take another three boards and extend the arc to the left. And so on and so forth till you reach the appropriate length. After the basic arc is done, you can build up additional layers (it's difficult to glue more than three layers at once I think; clamping forces will get too large, and the glue makes the board slippery)
Make two of these arcs, put them next to eachother with boards running perpendicular to the length as the deck.
Now for the tensegrity bit; Put some heavy duty eye-bolts or clamps on the undersides of the ends of the arches, and put a steel wire between them with a tensioner, and tighten it until it is taut. When someone is standing on it, this will keep the glulam beams loaded only in compression, meaning you'll only need a much smaller cross-section of the beams. (Normally when you'd stand on an arc, it will want to flatten, pushing the outsides out, and loading the underside of the arc in tension. The wire prevents this).
If you have enough wood on your property, it should not be very expensive to build. You could even saw boards with a chainsaw and a chainsaw-mill4 , but you'd end up with a lot of extra mulch. The wood would need to dry, though.
Roland
Engineering is part science and part art.
No matter what method of building a bridge you pick, the devil is always in the details.
You can buy a 53 flat bed trailer that DOT has labeled unsafe for $500 to $1500. I traded a local logger the tires, axles, etc for hauling it to my spot and he even put in in place with his logging equipment. I put 4 light poles about 4 feet deep at each end right against the trailer (SNUG)I then used some discarded guide wire just in case it tried to float. It gets covered by 6+ feet of water several times per year and has never moved. It's strong enough to drive a truck or tractor across. No matter what you build be sure to put it in s straight part of the drain. Curves cause more flow resistance. Not counting replacing boards it took us one day to install. Good luck!!!
Been there my friend.
http://img.photobucket.com/albums/v521/JackPatrickRyan/Bridge/17547a_Bridge_proj_73.jpg
I built a bridge. http://img.photobucket.com/albums/v521/JackPatrickRyan/Bridge/17547a_Truck_on_bridge_74.jpg
If you still want just a low water crossing, I saw one in Tennessee one time that looked like those concrete curbs they use at the front of a parking space in parking lots. Only difference is they were strung together with long links of rebar so it just lays in the creek bottom like wood rungs of a walking hanging bridge. The rebar keeps them all in place yet they just move enough to settle on the bottom and water runs between them and over them during high water.
If I wanted a crossing, that's what I'd do. You could make those your self easy. Just dig a row of forms in the dirt and lay rebar down so it goes through them all. When it's hard drag it all in to the crossing. You could pour them one at a time if you want to mix your own or just call a truck to come fill them all once it's set up.