Chicken killing checklist

The mean rooster has finally bitten the dust. Graphic photo ahead ---
beware!
After our last chicken-slaughtering day, Jan pointed me to a very useful chicken
butchering blog. Rather than re-creating that fine how-to
guide, I'll just mention a few things we've found to facilitate the
process.
First, it's well worth taking a little extra time to get all of your
materials together before you start. Here's my minimal checklist
(which of course would be larger if I was doing dozens of chickens at a
time):
 5+ gallon chicken dunking pot. (We used
the pot from a turkey deep fat fryer). Start this warming up now
on a propane stove outside.
5+ gallon chicken dunking pot. (We used
the pot from a turkey deep fat fryer). Start this warming up now
on a propane stove outside.- meat thermometer. (The temperature of the water in the pot should be 140-145 F.)
- work table or sink. (We just use a folding table, washed down carefully with bleach water.)
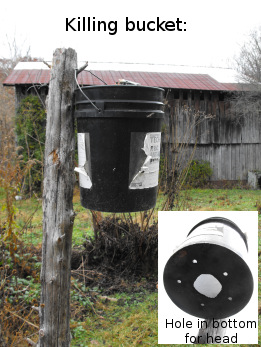
- Chicken killing cone. (Mark had the great idea of using a five gallon bucket with a hole in the bottom which was meant to be used to hang a tomato plant.)
- Sharp knife. (Take a few minutes to really sharpen it.)
- Rubber band for tying the chicken's feet.
- Wooden spoon for helping dunk the chicken in the pot.
- A hose to run plenty of water for rinsing.
- A bowl for the gizzards.
- A bucket for the feathers and entrails.
Your chicken, of course,
will have been separated from food (but given water) for at least eight
hours before all of this begins. Once your water is reaching the
optimal temperature, tie up your dog! (Lucy is learning to be
present during chicken slaughtering operations, but I wouldn't trust
anyone else's dog around the blood.) Then re-enter the food
chain!
Read other posts about killing and eating your own chickens:
And don't miss Mark's homemade chicken waterer invention. |
Want more in-depth information? Browse through our books.
Or explore more posts by date or by subject.
About us: Anna Hess and Mark Hamilton spent over a decade living self-sufficiently in the mountains of Virginia before moving north to start over from scratch in the foothills of Ohio. They've experimented with permaculture, no-till gardening, trailersteading, home-based microbusinesses and much more, writing about their adventures in both blogs and books.
Want to be notified when new comments are posted on this page? Click on the RSS button after you add a comment to subscribe to the comment feed, or simply check the box beside "email replies to me" while writing your comment.

I use a similar setup, except for the bucket. I like that idea, I'll have to try it.
For a workbench, I bought an old kitchen sink at a local market (like a car boot sale) for $5. I put together a frame for it, put a bucket under the sinkhole, and run a hose to it for rinsing. It's stainless steel, so very easy to scrub down with bleach before and after use. Having the flat drainage areas on both sides gives you lots of work room, and is useful when two people are processing two chickens at once (e.g. when showing someone else how to do it):
http://green-change.com/2011/02/20/diy-chicken-processing-station/
Mark's been talking about a stainless steel table of some sort --- I like your sink idea. (Too bad we didn't get a second big stainless steel sink when we found the one we currently have in the trailer for free! It is perfect in there and would be equally perfect as an outside chicken processing station.)
I highly recommend the bucket (or at least some kind of cone.) It makes the whole process quick and easy and keeps the inevitable thrashing around after the chicken dies to a minimum.